Print PDFs from iPhone and iPad using AirPrint
The Goal
 I want to use AirPrint on my iPhone or iPad to print to a PDF document on my Mac. For convenience reasons the PDF should be created on the desktop. Furthermore I don’t want to use any hacks or additional programs that run in the background all the time.
In this how-to you’ll enable AirPrint in Mac OS X (tested on Mac OS X 10.6.5), install a PDF printer using a free, open source driver and add an AppleScript which moves the PDFs printed on your iOS device to your Mac’s Desktop.
(If you’ve got the installed, a utility called Printer Simulator.app is available which simulates several AirPrint capable printers. You can use those to print from iOS to a PDF which will be opened in Preview. This requires that the program runs all the time which is exactly what I don’t want. It’s a great way great to test AirPrint, though.)
Only follow the next steps (at your own risk) if you have a full backup of your Mac and are comfortable using a shell (Terminal.app)!
The Preparation
Mac OS X 10.7 Lion users can skip this section and follow these instructions on how to use a tool called AirPrint Activator instead. Afterwards continue with the section The PDF Printer.
On Mac OS X 10.6.5 it isn’t possible to use every printer that is shared through the Mac for AirPrint. Only a few HP printers support AirPrint at the moment. Hence the first step is to enable AirPrint for every printer connected to the Mac.
A good tutorial (in German) can be found here and includes a downloadable script to do the work for you. If you want to use Terminal (or in case the site is not available) all you have to do is start /Applications/Utilities/Terminal.app and input the following line (all in one line):
sudo bash -c "echo 'image/urf urf (0,UNIRAST<00>)' > /usr/share/cups/mime/airprint.types"
This command asks for your (administrator) password and creates a file called airprint.types in the directory /usr/share/cups/mime/. The content of this file is image/urf urf (0,UNIRAST<00>).
After creating this file the Mac needs to be rebooted. After the reboot you can already use printers connected to the Mac for AirPrint. Just delete and recreate them in System Preferences → Print & Fax and share them in System Preferences → Sharing.
The PDF Printer
Once Mac OS X supports AirPrint for every shared printer, the preparations from above will most likely no longer be necessary.
To be able to create PDFs through AirPrint we first need a PDF printer on Mac OS X. The PDF button in the default printer dialog works great when creating PDFs locally on the Mac but it doesn’t help on iOS.
CUPS-PDF is a PDF printer available for many platforms. To install it, follow these steps:
- Download the Mac OS X version of CUPS-PDF
- Install it by unzipping and running the installer
- Go to System Preferences → Print & Fax
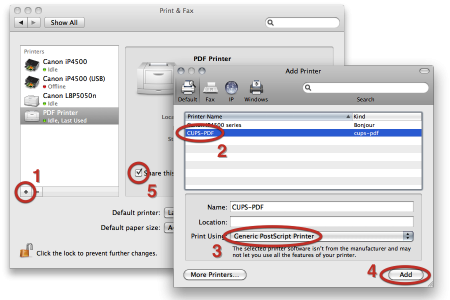
- The following illustration show the steps necessary to add the PDF printer
- Click the “+” symbol
- Select the printer CUPS-PDF (you may also give it another name)
- Select Generic PostScript Printer for “Print Using”
- Click “Add”
- Select the newly created PDF printer and mark the checkbox Share this printer on the network
Now print any document (e.g. this website) from your Mac using your newly created PDF printer. The PDF document is created in /Users/Shared/CUPS-PDF in a folder with your user account’s name.
When printing from iOS over AirPrint the PDFs are created in the guest account’s folder under /Users/Shared/CUPS-PDF and you won’t be able to easily access them due to missing permissions. Thus we will restrict the PDF printer to your account which results in correct permissions on the created PDF files.
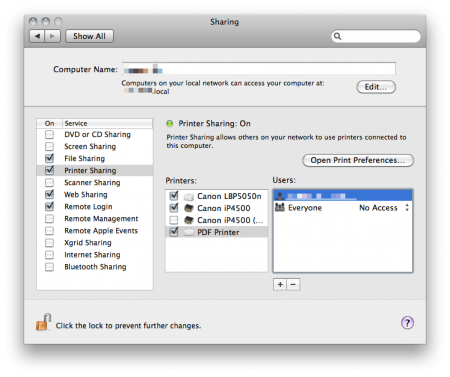
- For this go to Sharing in the System Preferences
- There you select Printer Sharing (make sure the checkbox is marked)
- Select your PDF printer
- Click the “+” button
- You get a popup where — under Users & Groups — you can select your account
- Click “Select”
In the Users list you should see your account’s name and Everyone with No Access. These steps make sure that you won’t run into permission problems later on.
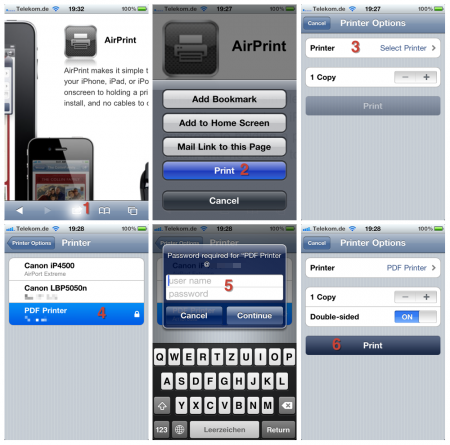
Now you can use AirPrint on iOS to print a PDF document to your Mac. Follow the steps in this illustration (click to enlarge), e.g. using Safari in your iPhone. When asked for your user name and password, enter the login data from your Mac OS X account (you allowed sharing of the PDF printer only with this account in the steps above).
Now your PDF document should be stored in /Users/Shared/CUPS-PDF inside a folder with your user account’s name (as during the first test print from your Mac).
If you want the PDFs to be move to the Desktop, follow the next (optional) steps.
The Icing on the Cake
To automatically move newly created PDFs to the Desktop (which is easier to access than the CUPS-PDF folder) we’ll use Folder Actions and an AppleScript.
You can simply create a new AppleScript by opening the AppleScript Editor located in /Applications/Utilities/ and inserting the code from below. Save the script to /Users/[your account]/Library/Scripts/Folder Action Scripts with a name like move - move files to desktop. This is the script:
(*
moves files to the desktop of the current user
*)
on adding folder items to this_folder after receiving added_items
  try
    tell application "Finder"
      set targetFolder to path to desktop folder from user domain
      move entire contents of this_folder to targetFolder
    end tell
  end try
end adding folder items to
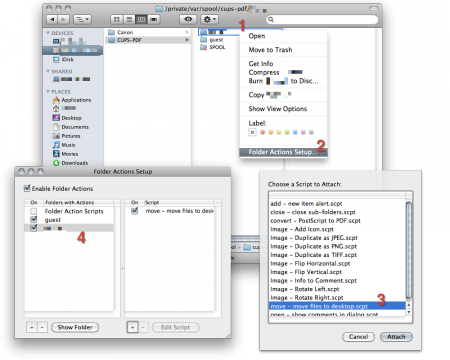
This simple script (when used as a Folder Action) moves all files in the folder to the desktop. Once the script is created you can attach it to the folder where new PDFs are stored: /Users/Shared/CUPS-PDF/[your account].
To do this, follow the steps in this illustration (click to enlarge):
- Right click or cmd-click on the folder
/Users/Shared/CUPS-PDF/[your account] - Select “Folder Actions Setup”
- In the popup choose the move script you’ve created earlier and click “Attach”
- Make sure that the script is attached to the folder named like your account
The End
That’s it! The instructions are a bit longer than I first expected. Also I think most of this would be scriptable, but I just don’t have the time to do this.
If you run into any problems or find errors in the instructions please leave a comment or tell me on .
January 29th, 2011 at 11:12
[...] of all, as Mac OS X 10.6.6 still does not support AirPrint, we need to enable it. This link provides a method to set up AirPrint on a Macbook and use it through [...]
June 6th, 2011 at 09:08
Hi,
Many thanks for this, I knew what I wanted to do, but I would never have been able to do it…
Excellent!
July 7th, 2011 at 06:13
:( doesnt work with 10.7
July 7th, 2011 at 21:30
I’ll have a look once I’ve got Lion.
July 12th, 2011 at 08:16
Thanks a lot! It just works… Cool!
July 16th, 2011 at 03:00
I tried this with above instructions, but it won’t work.
iPad2- Airprint
Mac Pro, sys 10.6.8
If I select my account under ‘printer sharing’ and the ‘cups-pdf’ I can’t get to is from my iPad.
If I select ‘everyone’ then I can print just fine.
I do have to change the permissions of the file after it is there- not a huge deal but an extra step.
If my account (on the MacPro) is selected, then the Cups-PDF is shown locked on the iPad, and I can select it, but nothing happens.
July 18th, 2011 at 18:49
That’s strange. I can’t reproduce it.
Make sure you allow your account on the Mac to use the PDF printer and deny for “Everyone”. That’s how it works for me.
August 9th, 2011 at 02:48
Just had the same issue Mark reported printing from iPhone 4 to Macbook pro 10.6.8, except that I could open the .pdf file in /private/var/spool/cups-pdf/ANONYMOUS without modifying permissions.
Thanks for the blog post, that was very useful.
September 15th, 2012 at 21:27
Instead of setting up the folder action, you can edit the file at /etc/cups/cups-pdf.conf and change the line (#43 on a fresh install) that says “#Out ${HOME}/Desktop/cups-pdf/” to “Out ${HOME}/Desktop/” (without the quotes) and save the file. Now the files will be saved to your desktop automatically.